Welcome to WordPress. This is your first post. Edit or delete it, then start writing!
Recent Comments
Welcome to WordPress. This is your first post. Edit or delete it, then start writing!
This one is pretty easy all you have to do is buy a domain from a registrar and create an A record for your server.
The process is similar between all of them. My preferred registrar is porkbun.com they offer good prices for the domains I buy. Whoever you choose to buy from doesn’t really matter from just make sure it’s not godaddy they’re the worst.
To create an A record it's pretty simple. The one I use for kart.moe/ looks like this:
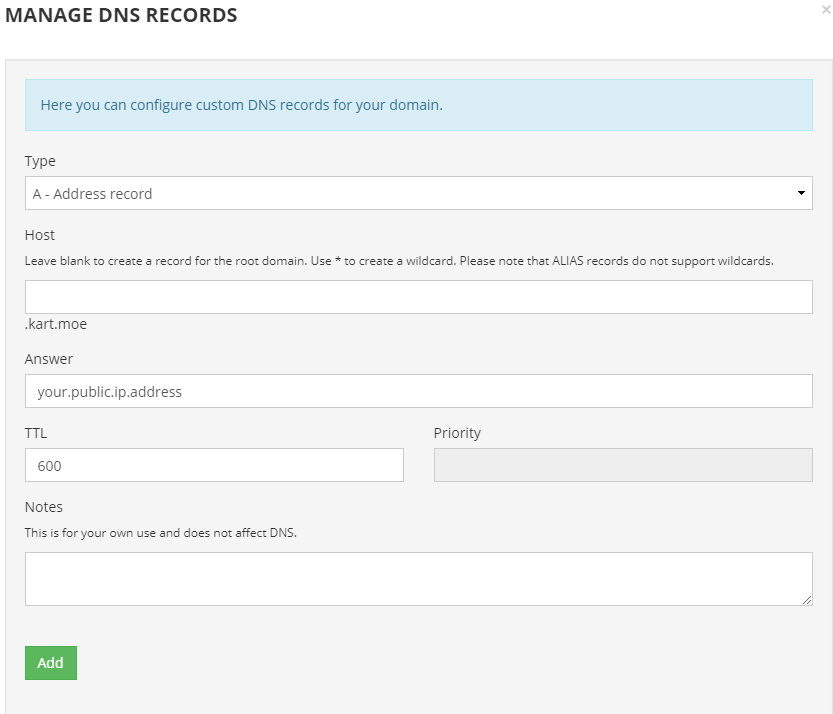
Leave the host or subdomain blank to point to your ip address and you’re done.
Note that on some registrars like porkbun they create a default record that points to their servers. Just make sure you modify that one or delete it and create a new one.
If buying a domain is too much I'm offering anyone reading this a chance to get a *.kart.moe/ subdomain free of charge.
Want yourname.kart.moe or mywaifu.kart.moe? Just PM me on discord (ヒーミー#1031) with the subdomain you want and your server ip address and I’ll set it up for you. It usually takes like a minute to create so you won’t have to wait long.
Happy karting!
With everything in place let’s automate the server so we can be lazy and not have to start it manually every time.
On the last post we successfully created a vanilla server of srb2kart that runs 24/7. Now you and your friends are having a fun time playing races with the base characters.
But what about custom characters? What about funny mods? Let’s add those to the server!
Continue readingSo you’ve decided to host a dedicated server 24/7 so you can play with your friends without having to leave your machine running but have no idea where to start. There’s so many questions on how to do this and you get thrown words at you like LINUX, DIGITAL OCEAN, CLOUD, VULTR, 24/7 SERVER but none of them make sense to you.
That’s why I wrote this guide to help with setting up a dedicated cloud server from scratch. Hopefully by the end you can get a server up and running with these steps.
Continue readingCurrent Version: v0.5 [Augmented-Burst-Storage System]
by Angular
This page is also a work-in-progress – mind the work zone for a while.
Download it here.
[The message board is the current v0.4 stable release, not v1.]
[general gif of bing bappin around]
Press and HOLD the [TRICK] button (BRAKE by default) to start a trick in midair!
You need to be ascending to start one in a Race.
[gif of meter starting]
Build the meter by holding down [TRICK]. Aim for the little purple for best results! If you overshoot, release the [TRICK] button.
[gif of wiggling meter bar]
Don’t have the [TRICK] button held when you hit the ground! Tony Hawk’s watching you.
[gif of trickfail 1]
Don’t OVERCHARGE [be in the red]! You’ll do a micro- mini-spinout [Depending on severity].
[gif of trickfail 2]
[gif of zippin, maybe 2]
[gif of store boost, gif of store after getting BOMBED]
[gif of augment gain, gif of bonking]
Tap the TRICK button ANYTIME in midair to do a mini-double jump! This double jump gives you a little mobility in the air as well!
[gif of hop]
Tap it AGAIN afterwards to perform a STOMP – You’ll rocket to the ground and zero in on foes.
[gif of stomp]
Changelog can be found here.
Afrorule/Pepperdork for the ghost effect code and the original “Tricks” mod, which Acrobatics was originally written on top of.
Ashnal and Callmore for assistance/wisdom and some small snippets of code.
The numerous people who play tested this weird mod and gave feedback – it all helps in some way.
Assuming Ubuntu. For other distros find the equivalent dependencies
Open up a terminal and type
sudo apt-get install build-essential git p7zip-full p7zip-rar nasm libpng-dev zlib1g-dev libsdl2-dev libsdl2-mixer-dev libgme-dev libopenmpt-dev libcurl4-openssl-devpkg-config/usr/lib/x86_64-linux-gnu/pkgconfig/libgme.pc
vanilla source code:
https://git.do.srb2.org/KartKrew/Kart-Public.git
moe mansion:
https://gitlab.com/himie/kart-public.git
Moe Mansion is for playing at 60fps and all the latest probably unstable features. Recommended for client if you’re playing the game on linux.
Vanilla is the same code that kart krew released for 1.3. Recommended for a server since it doesn’t need all the extra features in moe.
Clone the code with git from the moe repository this will get the moe mansion srb2kart 1.3 code (change the url to vanilla if you’re building for a server or don’t want moe mansion)
DO NOT use moe mansion to host a dedicated server. It should only be used as a client. Use vanilla if you’re hosting a dedicated server. There’s some reports that it works fine now as dedicated. If it’s not the case let me know on discord.
git clone https://gitlab.com/himie/kart-public.gitIn the terminal move to the directory you just cloned. Make sure to match the name of the repo that you cloned. Moe mansion is all lower case while vanilla uses upper case Kart-Public
cd kart-publicIn the future if you want to update your installation you can update the source code by pulling from the repository with git
git pullThis is the most basic line you can compile with. Add any extras as needed.
make -C src/ LINUX64=1LINUX64=1 to LINUX=1 if doing 32-bitNONX86=1 if compiling on ARM like an rpiNOUPX=1 to get rid of the upx warning at the end of compilingNOGME=1NOOBJDUMP=1 to speedup linking timeHAVE_DISCORDRPC=1
/usr/local/include//usr/local/lib/LIBGME_CFLAGS= LIBGME_LDFLAGS=-lgme before “make” to fix libgme errorsLIBGME_CFLAGS= LIBGME_LDFLAGS=-lgme make -C src/ LINUX64=1sudo apt install pkg-config it will deal with fixing libgme automatically if you have it installedIn the end your compile line should look something like this (this is what I use)
make -C src/ LINUX64=1 NOUPX=1 NOOBJDUMP=1After waiting for a while the binary will be compiled to bin/Linux64/Release/lsdl2srb2kart
As a good practice every time you want to compile again you need to clean the source folder to avoid getting weird errors. This is mostly necessary when switching branches but it doesn’t hurt to do it every time you compile. To clean simply add “clean” at the end of your compile line. You can quickly go back to what you typed before by pressing the up arrow key and adding clean at the end. Then to the same but with “cleandep”.
For example with my compile line above I would clean like this:
make -C src/ LINUX64=1 NOUPX=1 NOOBJDUMP=1 cleanmake -C src/ LINUX64=1 NOUPX=1 NOOBJDUMP=1 cleandepAnd then remove the clean to compile again
make -C src/ LINUX64=1 NOUPX=1 NOOBJDUMP=1What I like to do is move this binary to /usr/local/bin for easy access
While still being in Kart-Public folder in the terminal:
sudo install -Dm755 bin/Linux64/Release/lsdl2srb2kart /usr/local/bin/srb2kartAlso copy the icon
sudo install -Dm644 srb2.png /usr/local/share/pixmaps/srb2kart.pngNext you’ll need to obtain the assets for srb2 kart.
You can get them with the windows release https://github.com/STJr/Kart-Public/releases/download/v1.3/srb2kart-v13-Installer.exe
If you are running a desktop on linux you can download the installer.exe and open it as an archive and extract all the .kart .srb mdls.dat and mdls/ files
They should go in a folder called .srb2kart inside your home folder
You can also do it via the terminal:
Create the .srb2kart directory with mkdir
mkdir ~/.srb2kartMove into it with cd command (change directory)
cd ~/.srb2kartGet the Installer
wget https://github.com/STJr/Kart-Public/releases/download/v1.3/srb2kart-v13-Installer.exeExtract only the files we nee
7z x srb2kart-v13-Installer.exe "*.kart" "*.srb" "mdls.dat" "mdls/*"Delete the installer since it’s no longer needed
rm srb2kart-v13-Installer.exeNow you can run the game by typing in the terminal
srb2kart -openglWill use the .desktop files provided by SteelTitanium in the AUR
Type into the terminal:
sudo wget -O /usr/local/share/applications/srb2kart-opengl.desktop https://aur.archlinux.org/cgit/aur.git/plain/srb2kart-opengl.desktop?h=srb2kartsudo wget -O /usr/local/share/applications/srb2kart.desktop https://aur.archlinux.org/cgit/aur.git/plain/srb2kart.desktop?h=srb2kartIf the /usr/local/share/applications folder doesn’t exist create it with mkdir
Now srb2kart should appear in your applications menu.
Running with OpenGL lets you use models, better performance, among other things and it’s recommended.
Alternatively, you can do a rootless install, if you want to keep everything inside your home folder or are on a computer where you can’t access root (admin access).
Copy lsdl2srb2kart into ~/.local/bin, copy the .desktop files into ~/.local/share/applications, copy the icon into ~/.local/share/pixmaps
If everything on the guide worked fine you don’t have to do this.
Thanks to DudeValenzetti, MajorGnuisance, and Ashnal for helping in figuring out compiling and linux fu to make this guide noob friendly.