
On the last post we successfully created a vanilla server of srb2kart that runs 24/7. Now you and your friends are having a fun time playing races with the base characters.
But what about custom characters? What about funny mods? Let’s add those to the server!
Index
- Part 1 – Basics and setting up a vanilla server
- Part 2 – Adding mods to your server <– you are here
- Part 3 – Automating the server
- Part 4 – Getting a custom url for your server
Server Basics
Now that the server is running let’s review some Linux basics.
On the last post we installed srb2kart but where did it go?
Linux’s filesystem is a little different than windows. There’s no C:\ drive instead everything is in / or root. All the files for srb2kart where installed into /usr/games/SRB2Kart
However we don’t really need to modify this folder because the game creates it’s own config directory under our user’s home directory. On last part we created a new user called srb2kart. The system automatically generated a new home folder for this user under /home/srb2kart and the game has it’s own config folder in /home/srb2kart/.srb2kart
This .srb2kart folder is where we’re going to upload all of your configs and mods so the game can use them.
Uploading mods
We need a way to upload mods to the server. There are two popular programs to do this Filezilla and WinSCP. For this guide I will be using WinSCP because it’s simple and easy to use.
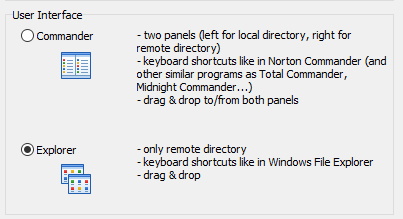
During installation it asks for which style you want to use. I recommend explorer style for ease of use as it’s the most similar to windows explorer.
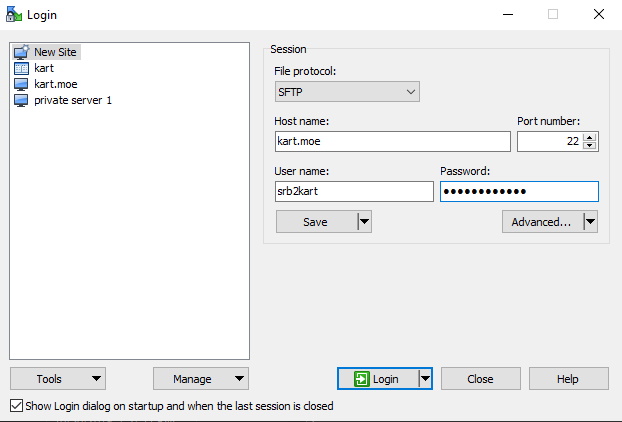
After installing WinSCP a new window pops up asking for the server info. Use SFTP for the file protocol, input your servers ipv4 address under Host Name, leave port number as 22, use srb2kart for username (we set it up on the last guide) and the password that you gave srb2kart. Then click on login.
By default there shouldn’t be anything after you login. On Linux hidden files start with a dot and since the srb2kart config folder is called .srb2kart you won’t be able to see it. To show hidden files press CTRL+ALT+H on WinSCP and now you should be able to see the folder.
Go into the .srb2kart folder and inside create a new folder called mods
Inside mods let’s create some more folders to organize. This will help as you add more mods to the server over time.
Create the following folders inside mods folder:
chars
tracks
loadfirst
loadlast
Pretty self explanatory. Put characters mods into chars. Put map packs into tracks. loadfirst should be used for mods that are required to be loaded in a certain order such as kartmp and battleplus. Anything else should go into loadlast
**Note that linux is case sensitive so make them all lower case**
Drag and drop the mods into the appropiate folders.
Lastly create another folder inside mods called index we’ll use this later.
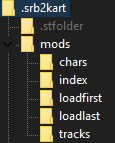
In the end your folder structure should be similar to this (ignore the .stfolder):
Starting the game with mods
With the mods in place let’s start the dedicated server with them.
If your game is still running on the server make sure to exit it by typing quit into the console then pressing enter. Press enter once more after it shuts down to get back the prompt linux line.
Now start the server again but this time with mods by specifying them with the -file parameter
srb2kart -dedicated -file KL_Mod1.pk3 KC_Mod2.wad KC_Mod3.pk3
Replace the mod lines with the actual name of the mods you are using. You have to do this for each mod you’re loading and they will be loaded in the order that you specify them.
The server is now up and running with the mods so let’s join it with a client.
To be able to join the server with mods every player must have the mods available in their srb2kart folder preferably under DOWNLOAD. However do not load the mods prior to joining the server. All mods will be automatically added in the proper order when joining the server.
Go to multiplayer and type the ipv4 address of your server and it should join with all the mods loaded!
You may continue like this but you’re gonna have to send all your friends the mods that you’re using and that can be cumbersome so let’s setup a way that they can download them automatically.
Providing automatic download of mods
In this part we’ll setup an http index so that the game can automatically download all mods upon joining the server. To accomplish this we need an http server running and we’ll use nginx for this as it’s really simple to setup.
But first we need to create an index where all the mods will be in a single folder.
Copying all mods to a single folder
Type this line to create an update script:
nano ~/.srb2kart/update.shCopy and paste the following code and save the file:
#!/bin/bash
shopt -s extglob
shopt -s globstar
shopt -s nullglob
cd /home/srb2kart/.srb2kart/

rm -rf mods/index/*.+(pk3|wad|lua|soc)
ln mods/tracks/**/*.* mods/index/
ln mods/chars/**/*.+(pk3|wad) mods/index/
ln mods/loadfirst/**/*.* mods/index/
ln mods/loadlast/**/*.* mods/index/
It’s a bit complicated to explain but in essence this script will read all the mods that you have put into the folders we created before and create a copy of them inside the index folder. The reason we do this is because when we link to a repo of mods the game cannot read mods that are inside folders. And if we instead had all mods in one single folder it would be a pain to define them manually each time in the proper order.
The solution then is to use the folders to load the mods automatically in that order and then use the update script to link them all in a single folder which is the public folder where they will be available for automatic download.
Run the script now to generate those files in the index folder. The script is a .sh file which needs to be run with bash. In the server terminal type:
bash ~/.srb2kart/update.sh
If you get an error that says “ln: mods/index/: hard link not allowed for directory” it means that one of the folders doesn’t have any files. If you’re not using any of the tracks/chars/loadfirst/loadlast folders comment them out on the script by putting a # at the beginning of the line. For example if you’re not using the “loadfirst” folder do this:
#ln mods/loadfirst/**/*.* mods/index/The script does a couple of things:
- Deletes all mods in the index folder (so you don’t keep old mods after updating)
- Copy all mods from the chars, tracks, loadfirst, loadlast folders into index folder
Now whenever you put new mods into their folders you should run the update.sh script to create the new index with the new files and then start the game with the new mods.
With all the mods in place in the index folder let’s actually make them available for download.
Installing an http server
To be able to provide the mods as downloadable we need to install an http server. Nginx is a small program that can do this quickly with minimal configuration so let’s install it now.
On the console for the server install nginx by typing
sudo apt-get install nginx
With this you should be able to type your server’s ipv4 address into a browser and get greeted by the default nginx message.
Next we need to edit the configuration files for nginx. We’ll use nano for this purpose on the terminal as it’s the easiest command line text editor to get started with.
To edit the nginx configuration type:
sudo nano /etc/nginx/sites-available/default
The nano text editor is really basic. You move around with the arrow keys and shortcuts to do everything are always available at the bottom (^ means CTRL key).
Go down to the part where it says
location / {

# First attempt to serve request as file, then

# as directory, then fall back to displaying a 404.

try_files $uri $uri/ =404;

}
and add this right below it with the same format as the default location:
location /repo/ {

autoindex on;

disable_symlinks off;

}
WordPress is removing my spaces but make sure you follow the same format. In the end it should look like this:
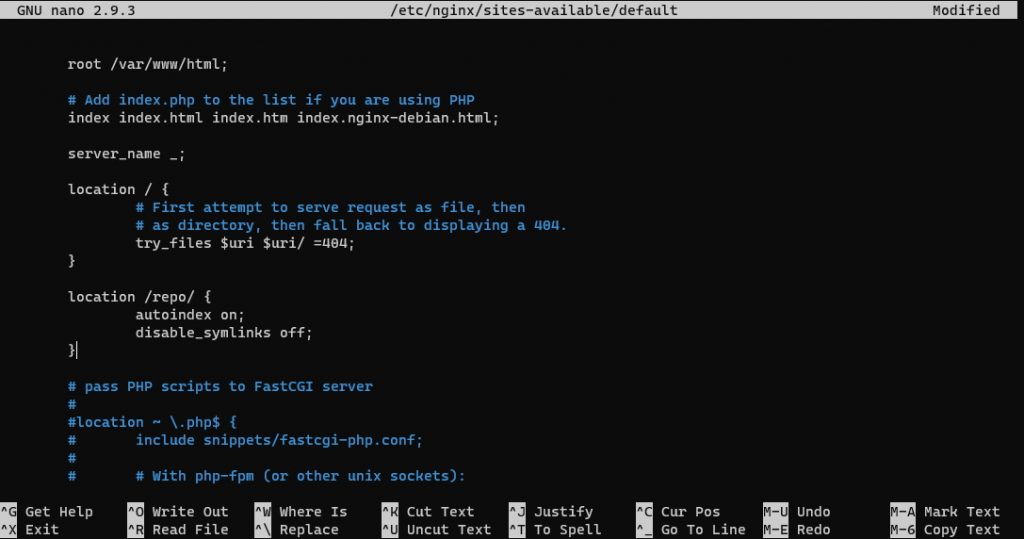
Save your changes by doing CTRL+O and pressing enter then exit by doing CTRL+X
By default nginx only serves files in the folder /var/www/html so now we need to link this /repo/ location we just created with the mod index folder.
Create a shortcut by typing this in the terminal:
sudo ln -s /home/srb2kart/.srb2kart/mods/index /var/www/html/repo
With everything in place let’s restart nginx to apply the changes:
sudo service nginx restart
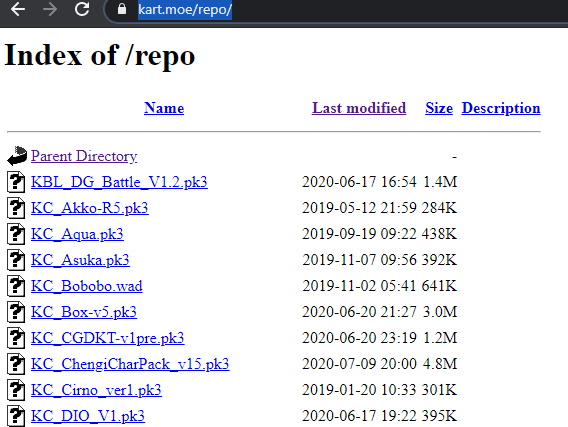
Check to make sure everything worked by using your browser and go to your servers ipv4 address and adding /repo/ at the end
http://youripv4address/repo/
You should see all the mods listed
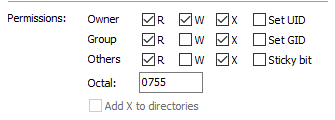
If at this point you get a 403 forbidden error check the permissions of the .srb2kart folder.
You can use winscp for this. Right click on .srb2kart folder and select properties. Then make sure they match the ones here:
Let’s add this url to the kart config. With nano modify the file kartserv.cfg (it will create this file if it doesn’t exist)
nano /home/srb2kart/.srb2kart/kartserv.cfg
And add this line to it. Replace youripv4address with the actual ip address of your server.
http_source "http://youripv4address/repo"
Save the file with CTRL+O and exit with CTRL+X
Load all the mods
Finally we can start srb2kart with all the mods! Let’s load them in order. Run srb2kart loading everything in the folders we created by typing:
bash -c "shopt -s globstar && shopt -s nocaseglob && shopt -s nullglob && srb2kart -dedicated -file ~/.srb2kart/mods/loadfirst/**/*.* ~/.srb2kart/mods/chars/**/*.* ~/.srb2kart/mods/tracks/**/*.* ~/.srb2kart/mods/loadlast/**/*.*"
All the * are telling the system to load everything in those folders. This way you don’t have to type them all one by one.
There you go! Now the game will load with all the mods you added and the clients will automatically download all the mods when joining your server. Remember to run update.sh script every time you change the mods! Remember that the server will only run if you have the terminal window open. If you close this window the game server will shut down as well.
In the next post I’ll write about how to automate this whole process so the server can run as a service in the background without having to have a terminal window open.