
So you’ve decided to host a dedicated server 24/7 so you can play with your friends without having to leave your machine running but have no idea where to start. There’s so many questions on how to do this and you get thrown words at you like LINUX, DIGITAL OCEAN, CLOUD, VULTR, 24/7 SERVER but none of them make sense to you.
That’s why I wrote this guide to help with setting up a dedicated cloud server from scratch. Hopefully by the end you can get a server up and running with these steps.
Index
- Part 1 – Basics and setting up a vanilla server <– you are here
- Part 2 – Adding mods to your server
- Part 3 – Automating the server
- Part 4 – Getting a custom url for your server
What is a server?
While there are many words to describe it such as “the cloud” or “server” or “vps” these are nothing but simple computers hosted at a data center. Usually they run linux because it is a free operating system and can run even with low amounts of ram.
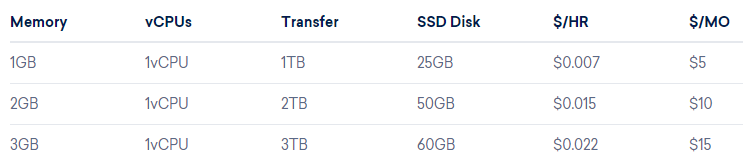
The most common cheap option with any provider is a single core virtual machine with 1gb of ram. This is more than enough to run a dedicated 24/7 kart server. These usually go for $5 a month and are a great option to get started. However, there are a few notable cheaper options such as the vultr 1 core 512 of ram option for $3.50 that I’ll talk about more in depth later.
Which one do I get?
Let’s look at some of the options:
Digital Ocean:
Vultr:
Linode:
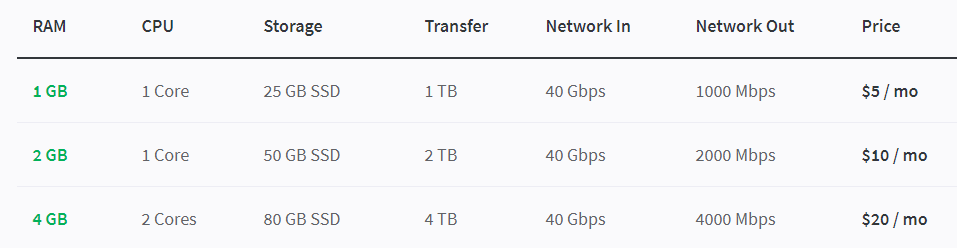
These are the most common options for costing a cheap server. As you can see they all share the same 1 core 1gb ram for $5. It doesn’t really matter which one you choose they’re all good for what we need.
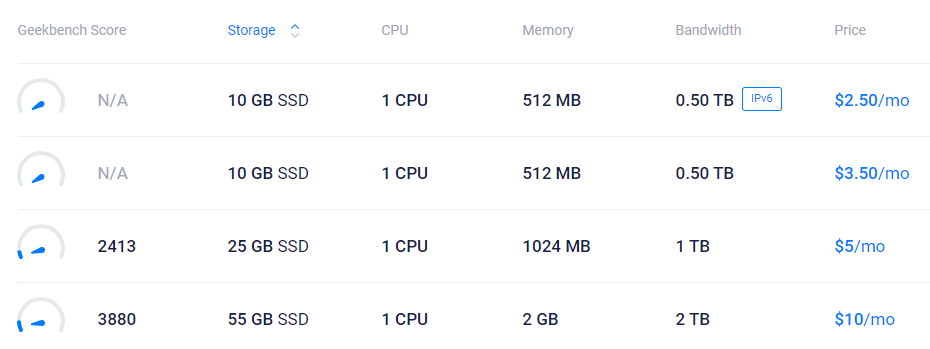
However I need to touch on Vultr for a second. As you can see they have a cheaper $2.50 plan! Why isn’t this recommended more? Well as you see they have a pretty important highlight there that says IPV6. This means that the server does not have an IPv4 address. SRB2Kart only works with IPv4 so avoid getting the IPV6 option! If you want the absolute cheapest, at the time of writting it is the $3.50 option from vultr with only 512mb of ram. I have not tested it but it should work. Personally all the instances are run are the $5 option from linode.
They all will work the same for our purposes so go for whichever one. Personally I use linode but a lot of the people in the kart server are using digital ocean. Either way the configuration steps will be the same for all of them.
All of these servers are billed per month and you are under no obligation to keep paying for a year. For most of them you only get charged for the time your server stays online. So if you decide you no longer want to host you can shut down the server and you’ll only have to pay for the time you incurred that month while the server was online.
As for the data transfer per month you should not worry about it. A dedicated kart server will almost never hit the 1TB transfer limit. However if you host a ton of mods with a lot of users the 0.5TB option might be an issue. Casual Army for example uses more than 0.5TB of data per server but that’s a heavily modded public server. I doubt a normal server will reach the limit the way casual army does.
Creating a server
So you’ve decided on a host. I’ll use Linode for the rest of the guide since it’s what I use but the steps will be similar to all of them.
Once you have created your account with the host of your choice, you will need to create a server. In Linode they are call linodes so let’s go ahead and create one by clicking on the Create button.
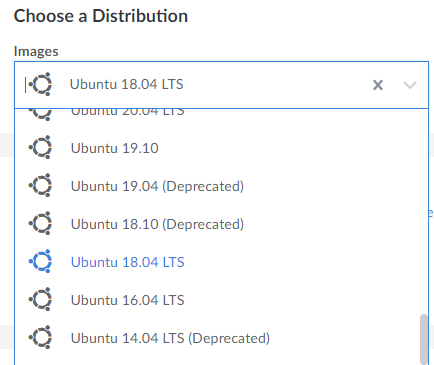
During setup it will ask you some things about the server. The first one in our case is the distribution. Distributions are different flavors of linux and they’re all configured slightly different. You don’t have to worry about it however, because our choice here is simple and straight forward. Kart Krew officially supports Ubuntu 18.04 and this is what most of the community runs so let’s go with that one. Make sure you select Ubuntu 18.04 LTS and not Ubuntu 20.04.
You may go ahead with Ubuntu 20.04 if you wish but it will be slightly harder as you will need to compile the game on your own because Kart Krew does not distribute files for 20.04. If you do wish to go ahead with 20.04 I have a guide for compiling the game. But to make your life simpler please choose Ubuntu 18.04
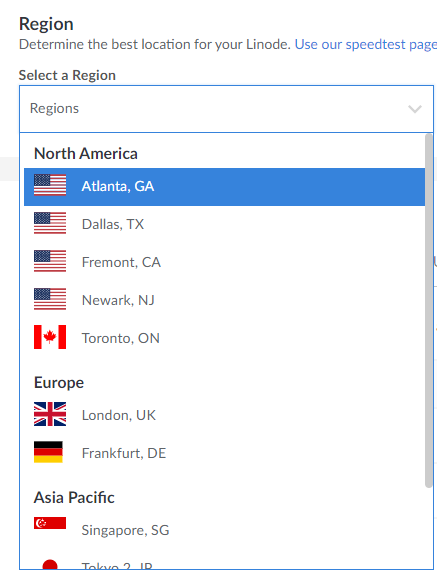
Next up is the region. This is the physical place where your server will be hosted at. I cannot make the choice for you here because it depends on where you and your friends are located. So go ahead and choose the region closer to you so you can have a lower ping.
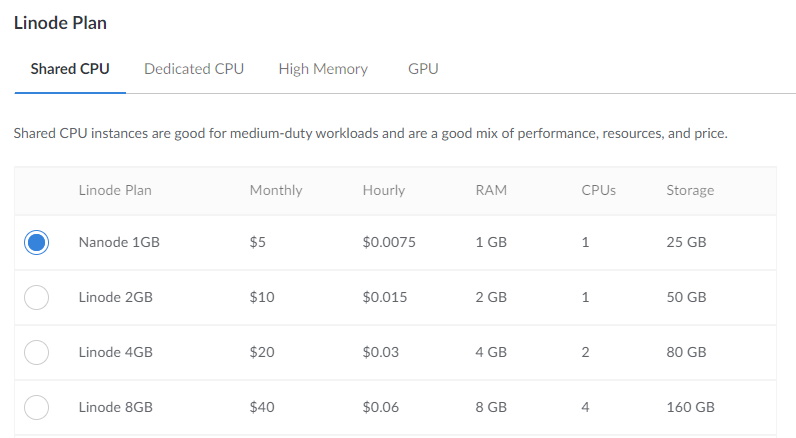
This is where you have to choose the plan for your server. This is what will define how many cores you have, how much ram, and most importantly the cost of the server per month. I’ll go with my cheapest option which is $5.
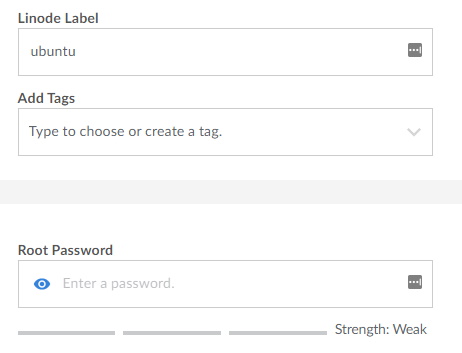
For the label you can put anything. This is what your server will be named in your dashboard but you can leave it as default. Don’t need any tags either.
Now the root password is important. This is the administrator password that you will need to login to your new server so make sure it’s something secure but also one that you will remember!
These are all the options necessary to create a server. Linode includes a few options such as backups and private ip but you don’t need any of those. Now that everything is configured click on that create button to create your server.
Accessing the server
Congrats now you have a linux server to run kart on!
Now what? Let’s get familiarized with the interface first. You probably got dropped into the dashboard of your new server so there are a couple thinks to note.
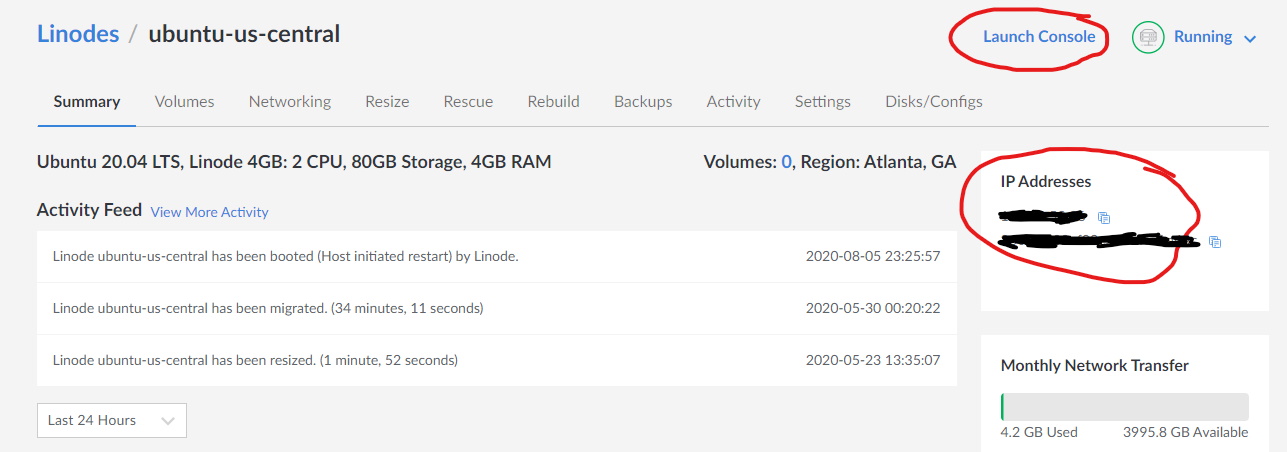
Here in the dashboard the main things you need to look at are the ipv4 address of your server and the launch console button. This is the ipv4 address that you will need to tell your friends to join once you have the server running.
There’s not much else to look at in this page so let’s launch a new console to access the server.
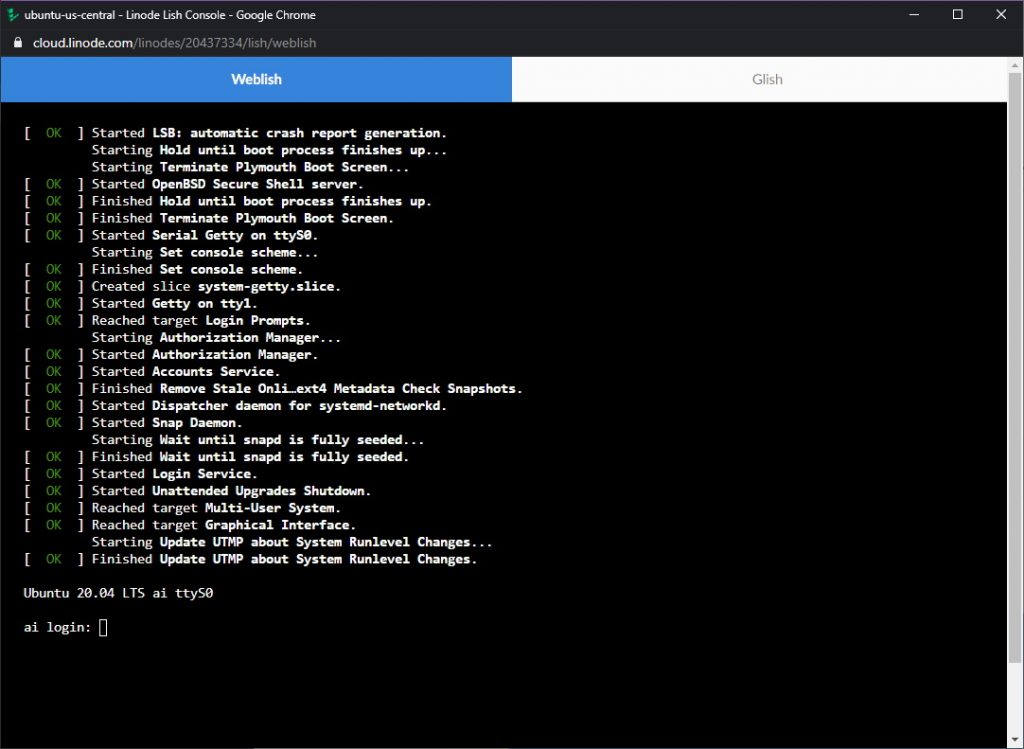
A new window will open and this is what you see. This is a linux terminal. If you are new to linux I suggest you take a look at a guide on linux basics. Digital Ocean has a great guide to get you started.
Here we are presented with a terminal asking for a login. The default administrator username is called root so go ahead and type root and press enter.
On the next line it asks for the password you used during server creation. Note that nothing will display as you type your password. There are no **** asterisks appearing as you type. There will be no indication whatsoever that you are typing your password. This is a security measure from linux so people watching can’t guess your password by its length. However your password is indeed being typed so go ahead and type it and press enter. Hopefully you haven’t forgotten it already.
Now you will see a screen with info about your server and at the bottom that says root:~# This is where you will be typing commands from now on.
Creating a new user
By default we logged in with the root user which is the administrator. It is not recommended to run everything as root so let’s create a new user.
In the terminal type:
adduser srb2kart
It will ask you give it a password and confirm it. Just like at login you will not see anything while typing the password but it will be there.
As for the user information you can press enter on all of them to use the defaults.
Let’s give the new user admin access so it can install files too
usermod -aG sudo srb2kart
This will allow srb2kart user to run sudo commands which are needed for installing new files and modifying the system.
Close the console window and open a new one but this time login with the new srb2kart user we just created instead of root.
Installing the game
With our new console open logged in as our srb2kart user let’s install the game.
Since this is your first time using sudo the server will give a small intro to it after typing the first line. Anything run with sudo requires your password since they are administrator commands. It remembers your password for a while so you won’t have to type it every single line. As usual your password will not appear on screen as you type it.
Type these 3 lines:sudo add-apt-repository ppa:kartkrew/srb2kart
sudo apt-get update
sudo apt-get install srb2kart
Since we’re on Ubuntu 18.04 these should just work and the game is now installed.
Run the game
Now with the server setup and the game installed let’s create a quick simple dedicated instance of srb2kart. To do this type this command into the console:
srb2kart -dedicated
That’s it! Now you have a dedicated vanilla srb2kart server running and you and your friends can join it by typing the ipv4 address of your server.
If you want your server to appear on the master server list add -room 33 after -dedicated.
On the next part of the guide I’ll cover how to add your favorite characters and mods to the server.
To add mods to the server check part 2 of this guide